

how to draw fantasy animals
When you're drawing creatures, it's vital that they're believable. No matter how crazy your designs become, just remember that they must always be grounded in some way – usually through correct anatomy – if you want to keep your audience engaged.
Here, I'll explain some tips I've learned about drawing believable creatures (see more creature design tips here), and how you can make sure your fantasy creatures look as real as possible. For more advice on creating believable characters of all genres, see our post on top character design tips. Also, for advice on drawing humans, see our post on how to draw muscles.
Click the icon in the top right of each image to enlarge it.
01. Create thumbnails
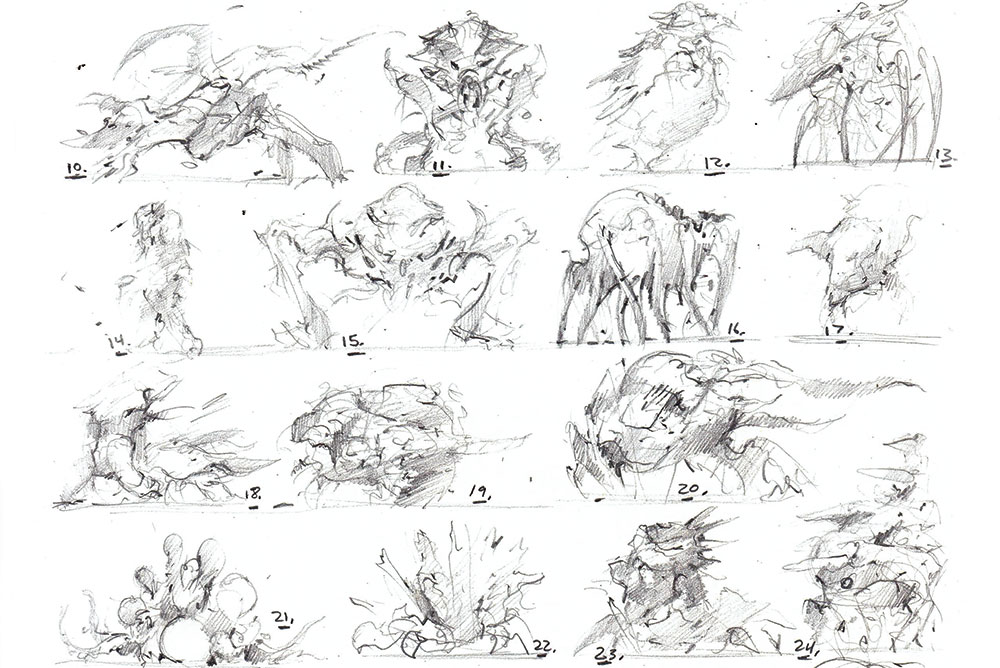
A step that's often skipped in the design process is the thumbnail creation process. Chances are that you won't land on your best design right out of the gate. This is where thumbnail exploration comes into play, with the addition of studying real-world reference.
Don't worry about details at this stage. Instead, focus on shape language and just having fun with the shapes you're creating. By doing so, your final design will be that much more thought-out and believable, and your passion for creating will shine through.
02. Keep exploring
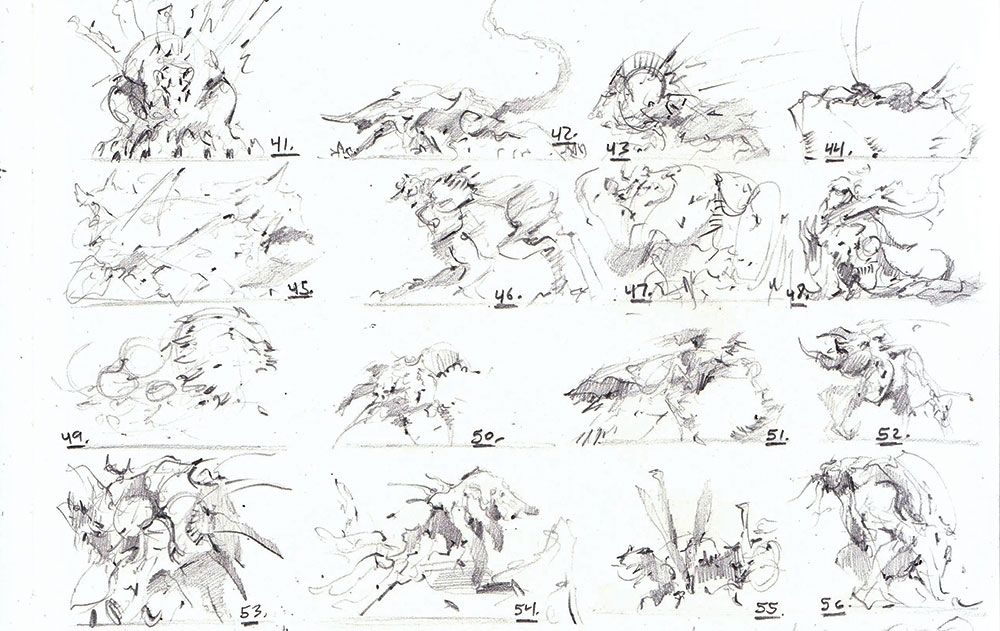
You can never do too many thumbnail sketches. This stage is vital and ensures that you're exploring as many avenues as possible. A lot of times, we'll get a specific idea in our head and think that design is the final.
Although this does happen on rare occasions, chances are you're far from landing that awesome final design. Thumbnail creation will ease the process and surprise you at the same time. That's why it's so fun!
- How to draw: the best drawing tutorials
03. Look beyond the norm for ideas
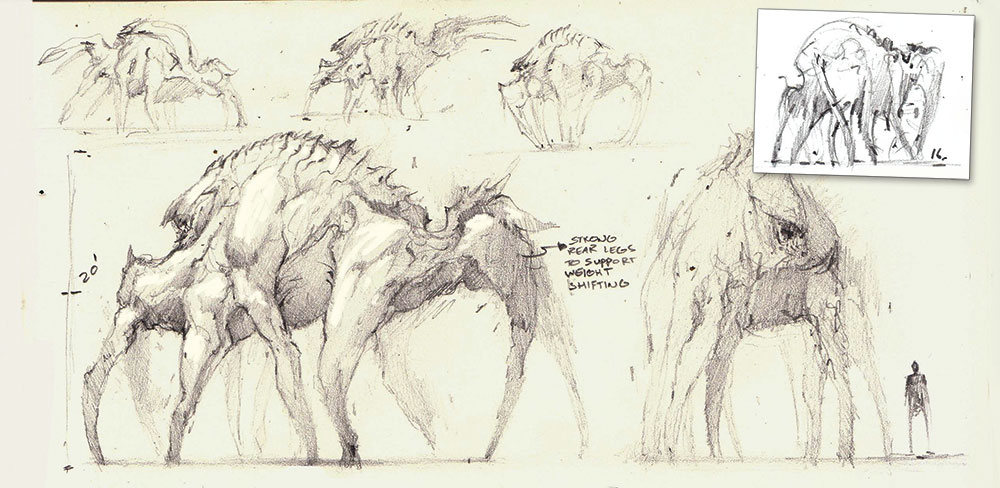
The first thumbnail that interests me is number 16. One of the important aspects about choosing thumbnails is finding an interesting silhouette. In this case, a multi-legged creature with a strange torso excites me and I go with it.
I try to find silhouettes that don't follow standard shapes, which verge on the cliché. For instance, it's common to see creatures with hulking shoulders and small heads. There's nothing wrong with that; however, I'm aiming for a non-traditional design.
04. Mix the familiar with the new
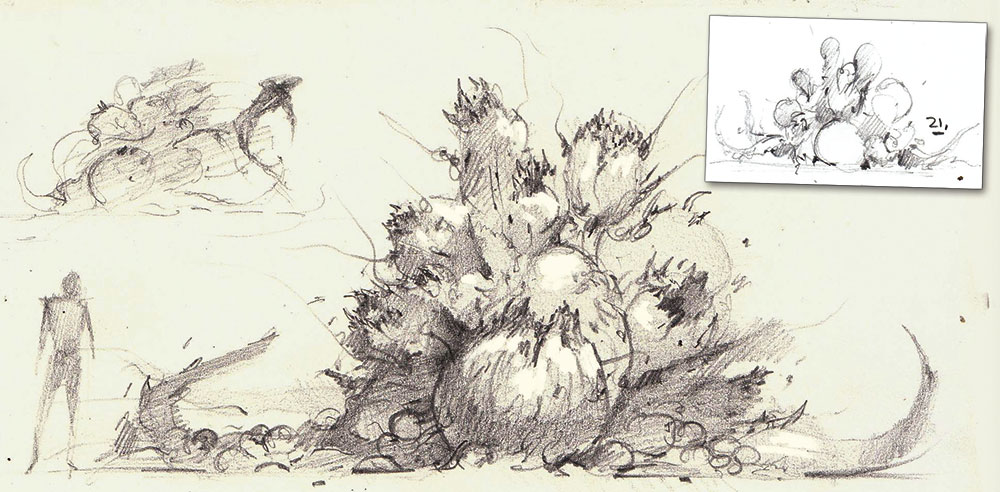
Thumbnail number 21 intrigues me, specifically because I never intended for my creature to look like fungus. The silhouette is working because we have a familiar shape while it still looks unexpected.
Whenever I sketch creatures, I try to ensure there's a uniqueness with a touch of familiarity. But I'll go into more detail about familiarity in a later tip. With this thumbnail, I explore plant shapes and try to imagine how this creature will move and eat. Let's see what the third choice brings.
05. Combine real-world insects
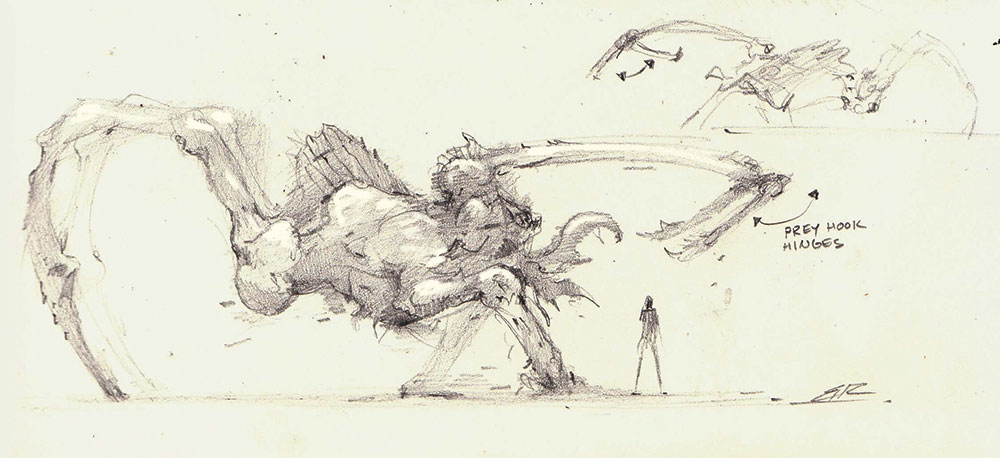
This thumbnail intrigues me because it's a mix of insect shapes. Insects have been a major influence in my creature designs. In this particular case, I use shapes from crickets and spiders. The rear legs offer a unique shape, they bow outwards and are able to support the creature's weight, as well as aid jumping.
I'm also choosing this as the third thumbnail to develop because something about it says 'other-worldly' to me. It's a shape that's not common and should offer fun possibilities. Unexpected shapes can turn into awesome designs down the road.
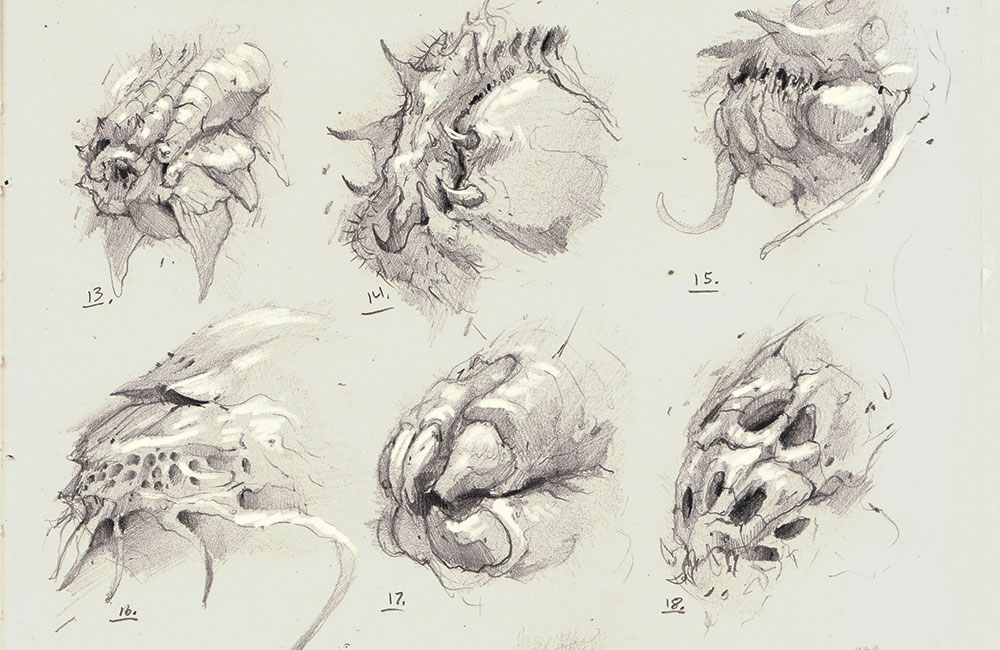
06. Think carefully about the head
One of the most enjoyable stages in the creature design process is head exploration. Here, I'm exploring the first round of head designs. I know that I want something insect-like and creepy.
So, I begin looking at references of Earth insects and arachnids. Whenever you're stuck and don't know where to go next in the design process, just take a good look at real-world animals. They offer all of the answers and give you clarity when coming up with new designs.
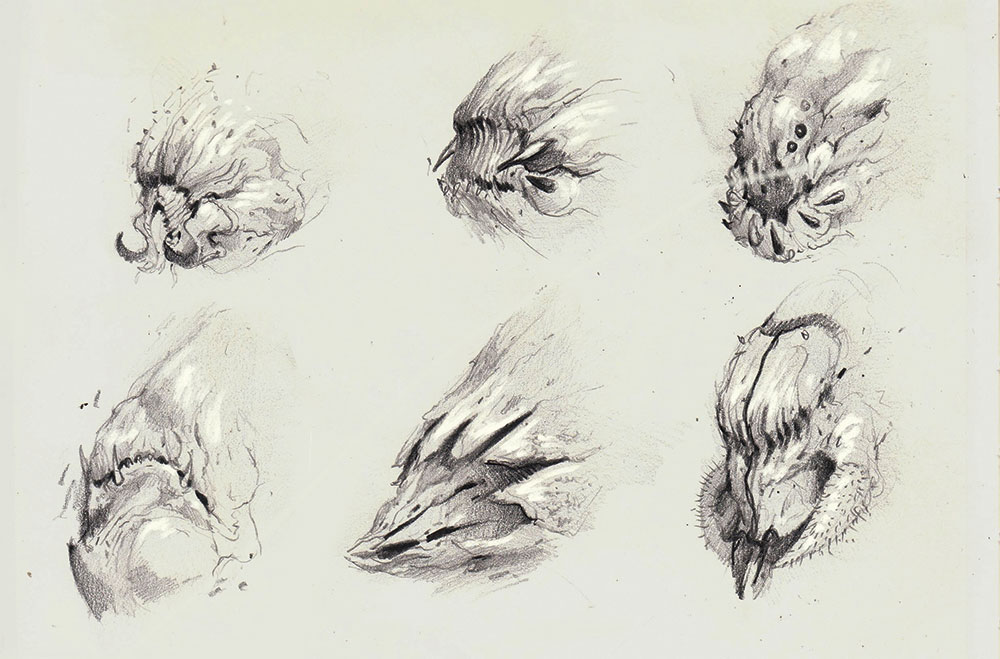
07. Maintain the shape language
It's important not to limit yourself when exploring with thumbnails. So I'm doing a second round of head studies just so I have a good number of ideas. It's easy to get carried away with random shapes and not-so-believable features.
With these head studies, I make sure that all of the shapes stay within a unified shape language. For instance, number 5 looks like a combination of an earthworm's head and bark from a tree. I make sure that all of the shapes taper like a worm's head and the ends look like broken bark.
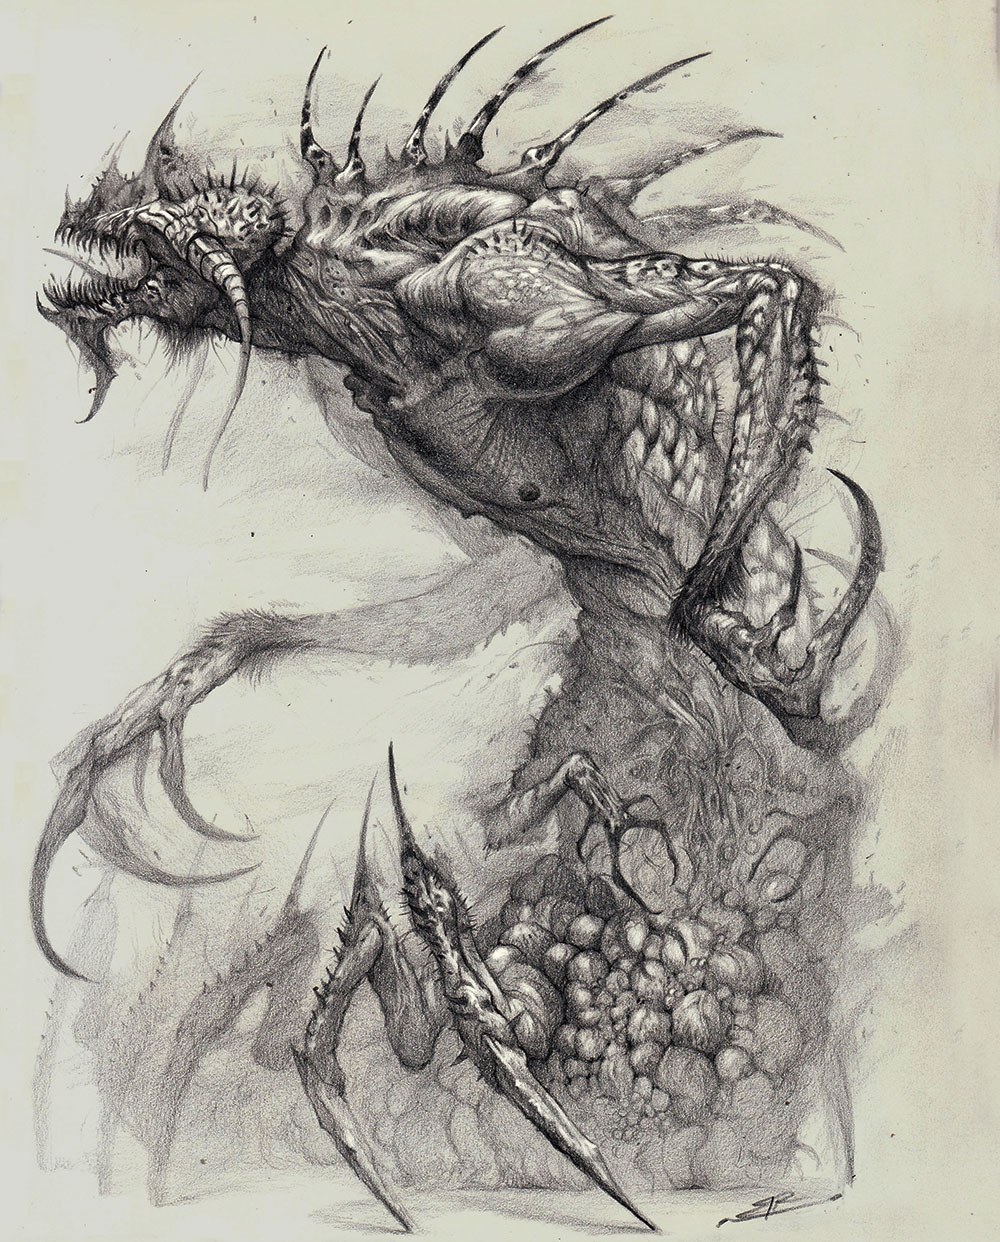
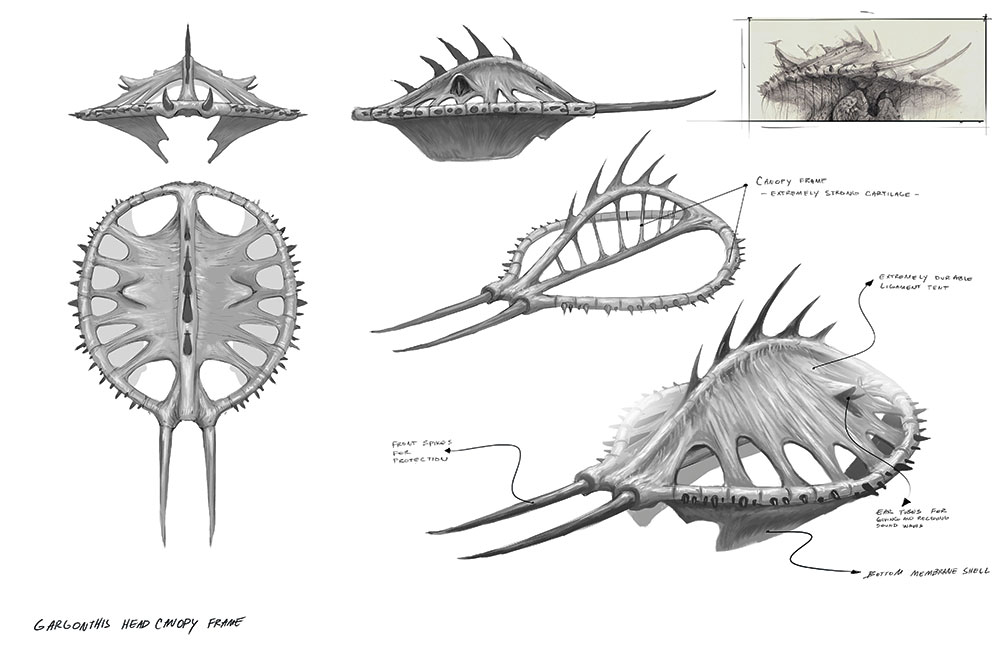
08. Finalise head design
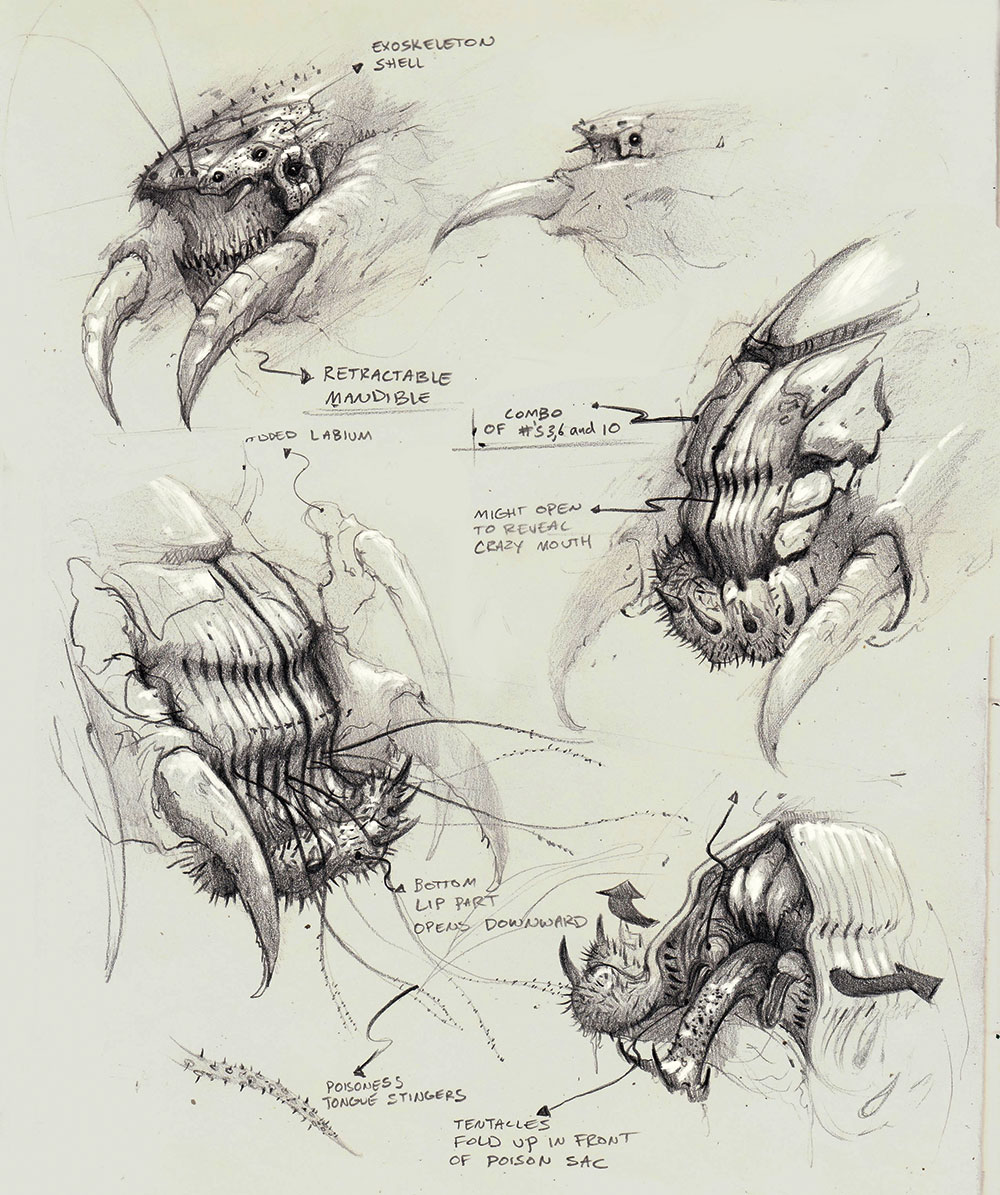
Refining the head is so much fun. This is where you can really bring the creature's personality out. Here, you can see that I go into detail about the creature's face, functions and overall aesthetic.
I go into the importance of call-outs in tip 12, but here you can see they're useful for describing a functional feature. And make sure that your creature has personality. This doesn't necessarily mean facial expressions, but the skull design, eyes, mouth, muscles and overall shape are very important.
09. Add muscles and tissue
Apply these stages of anatomy design to your development process, and see how far you can push the believability of your imaginary creature…
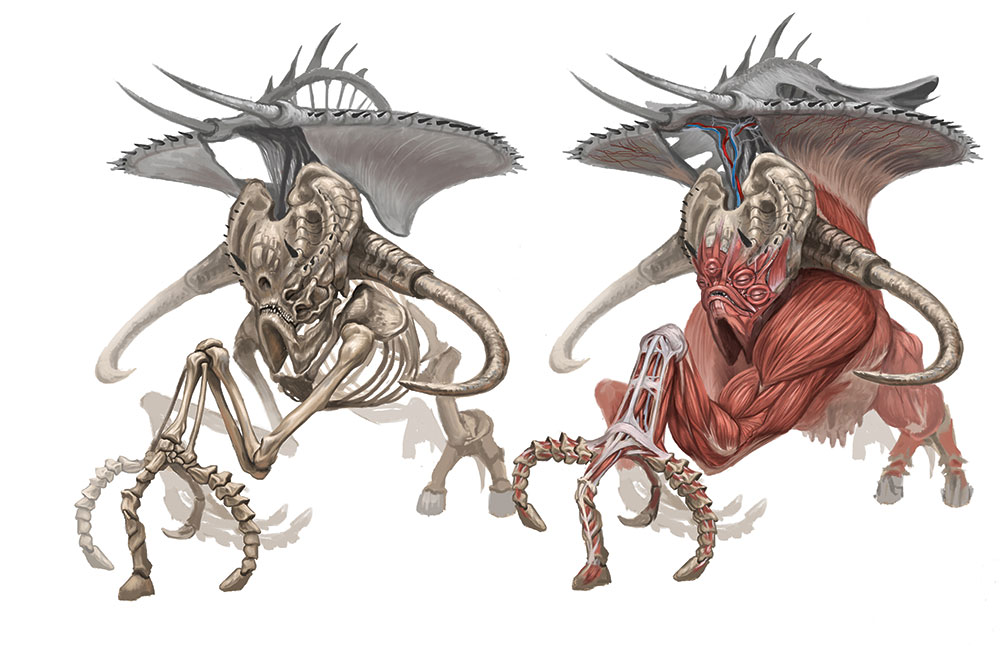
When thinking about your creature's anatomy, consider the bone structure first. This stage is often forgotten because we want to jump right into the cool skin textures and muscles. I sketch the creature's skeleton on the left followed by what the muscles will look like attached to the bones on the right.
Now we have a clear indication of the muscle structure in front view. The skull should be drawn before any other bones because even the skull can show personality, which dictates the facial structure later on.
10. Put the legs on show
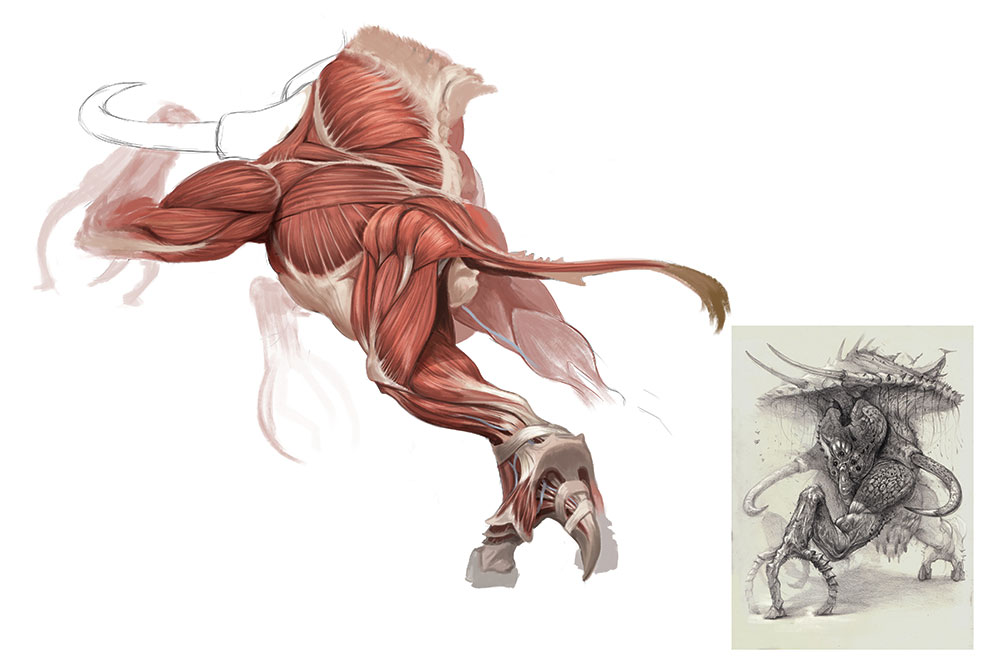
Next, I'm painting a rear view with lots of energy so that I can see this creature in action and what muscles are helping it push off the ground, as if it were running or attacking.
Rear three-quarter views are just as important as front views in selling your design, because we're not limited to just one angle. I'm fading the arms off because they aren't the focal point here – the legs are. I want to make sure the legs get the attention they deserve.
11. Combine anatomy elements
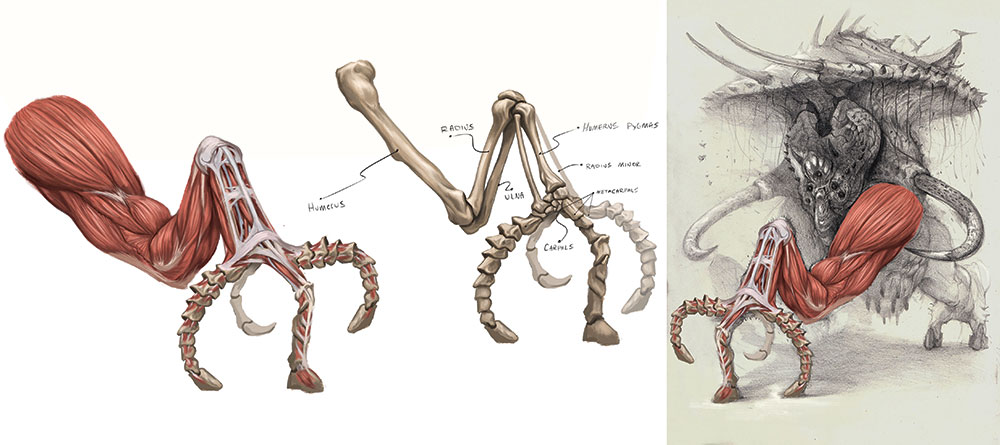
Now, I go into detail about the tendons and muscles of the arms and then juxtapose that on to my original pencil sketch. I'm choosing the arm for the close-up because it's a complex array of tendons, ligaments and muscles.
If you have a certain area of your creature that needs clarification, this becomes your chance to go into detail and ramp up the believability to your design. Because I've juxtaposed the muscle rendering on top of the pencil sketch, we can now see underlying anatomy.
12. Decide on sketch
Out of the three sketches I developed earlier, I'm choosing the third ideation because of the uniqueness of the silhouette. Proportions are key because it helps solidify a design.
Its arms, legs, torso and head aren't too long or too short. The shapes are just the right size so we don't question something being out of place. This creature has unique proportions so I must make sure it remains believable using real-world reference.
13. Consider skin texture
Skin texture is extremely important because it adds realism to your creation. It also gives the viewer a close look at your creature's environment, eating habits and evolution. With skin texture, I'm figuring out what type of environment my creature lives in. And with this information, I can begin to tell its story.
14. Use call-outs
Call-outs enable you to explain a certain feature about your creature. Movement, weaponry and feeding are just a small numbers of features you can have for your creature. The problem I see with a lot of creature design is too many ambiguous surfaces with no real thought behind them.
Calling out certain areas and explaining what they are helps make the creature more believable. I use call-outs to give my creatures a sense of purpose.
15. Show energy
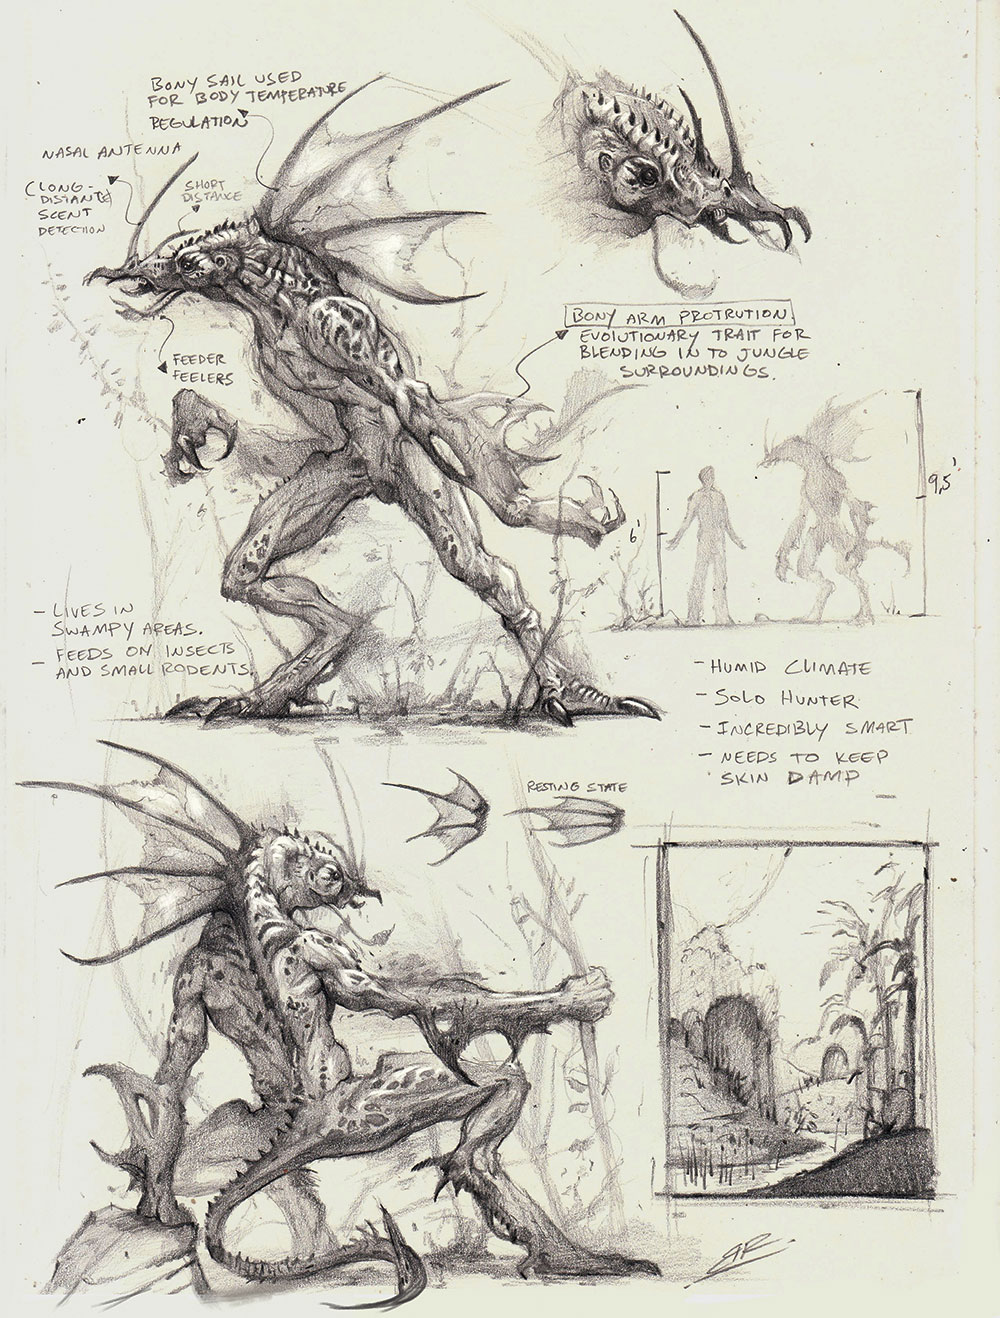
Showing energy and movement gives a real sense of how your creatures moves as if it were standing in front of you. Conveying that type of realism will be helpful when you're sending your sketches off to the art director and modelling department. They need to get a real sense of how your creation will behave as a living, breathing creation. Energy brings your design to life.
16. Bring in a degree of familiarity
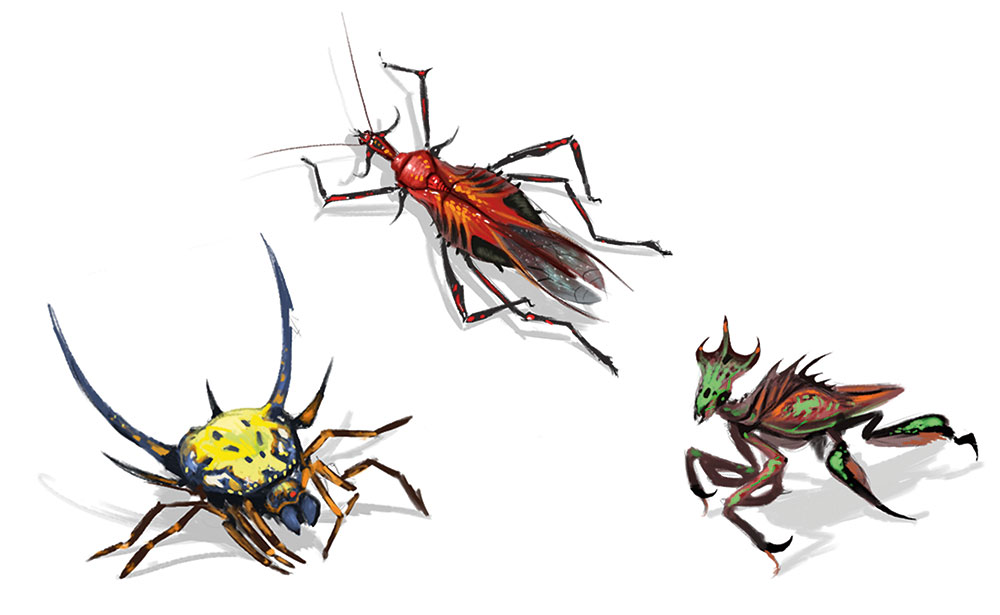
Establishing familiarity means you're bringing recognisable shapes into your creature design. Indeed, this approach should be applied throughout the design process. These fantasy insect sketches are based on mood boards that feature images of different insect species, because my creature is heavily influenced by bugs.
- 20 tips for creating mood boards
The more I paint these fantastical extrapolations of real-world creatures, the more familiar I'll be with what actually exists on Earth. This will help me create a believable creature in the end.
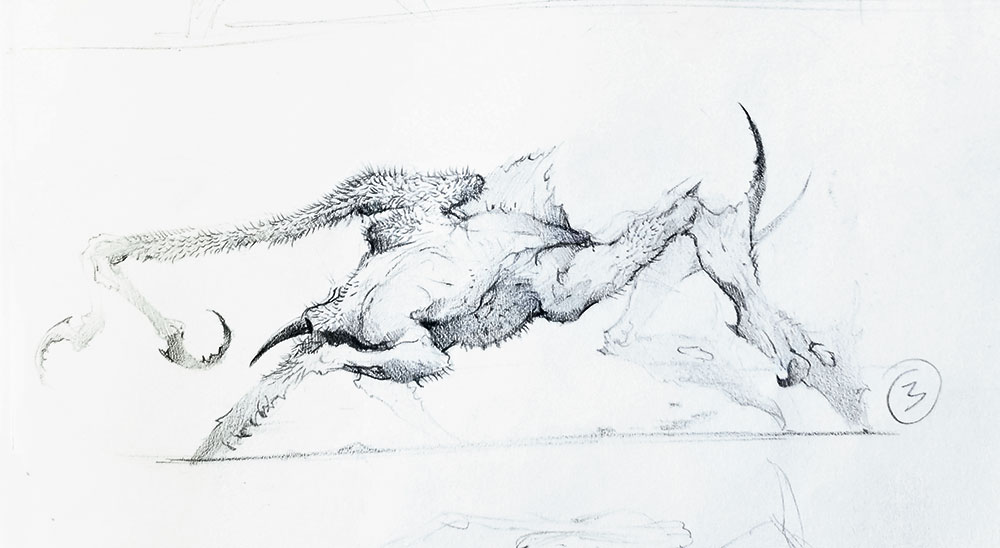
17. Put it all together
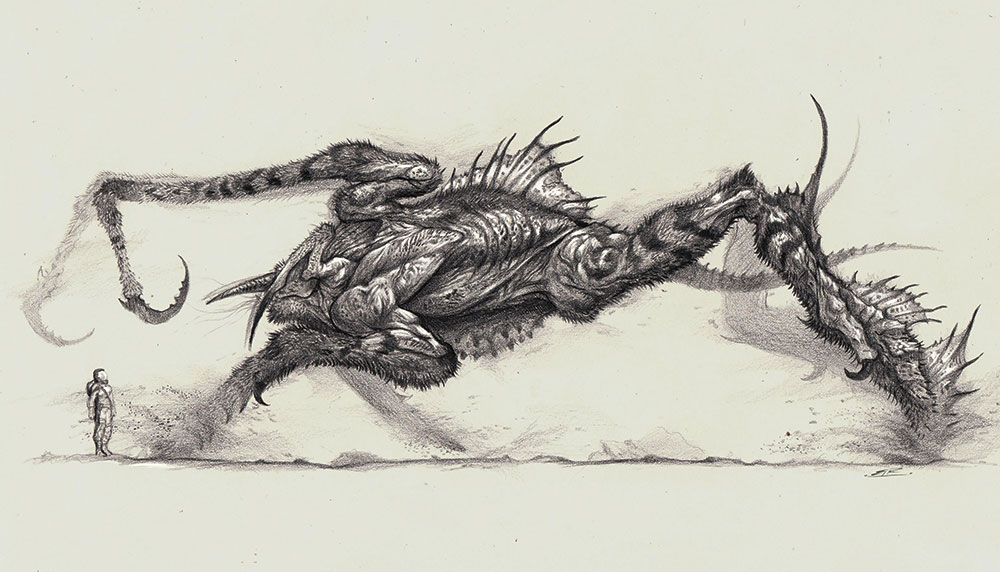
I combine all of the stages of my design process into a single sketch. A side view keeps things simple and can show enough of the creature to get a sense of its proportions, textures, and build.
Don't limit yourself to just doing a side view, though. A front three-quarter view is also effective and can show anatomy as well. When making your final sketch, think about what story you want to tell the audience. Is your creature believable? If so, you've done your job as a creature concept artist.
This article was originally published in ImagineFX , the world's best-selling magazine for digital artists. Subscribe to ImagineFX here .
Related articles:
- 20 sketching tips to help you make your first marks
- 15 tips for creating characterful creature art
- How to achieve scale in your paintings
how to draw fantasy animals
Source: https://www.creativebloq.com/how-to/16-ways-to-draw-better-creatures
Posted by: grimesafflumad.blogspot.com
0 Response to "how to draw fantasy animals"
Post a Comment